
Your learners are smart. They have entire, broad-reaching depths of knowledge that would make it all too tempting to skip your carefully crafted learning experience. While we all love making life as easy and aesthetically pleasing for our learners as possible, you don’t necessarily want them skipping their way through your Thinkific tutorial—especially if there’s a big, tempting shortcut on the bottom of their screens. After all, the last thing you’d want is for your learners to bypass the lesson you put all that effort into for the simple lack of a few lines of code to hide that pesky “Complete & Continue” button.
If you’ve struggled to make Thinkific and Articulate Rise play nice, you’re in the right place. With tools you’ll only find with Mighty—our Chrome extension that gives you even more control over font size, personalized transitions, line height, and more—you can make magic happen. For this Thinkific + Rise tutorial, let’s dive into exactly what you need to do to get rid of that Complete & Continue button and get your course the undivided attention it deserves.
Part One: Thinkific tutorial—Adding a Rise 360 course
- First things first, you’re going to add your Rise course to Thinkific. On the Edit Course page, select “Add Lesson” then select “Multimedia.”
- Take the output that you got from Articulate when you published to web, likely located in your Downloads folder, and unzip. Go into the Content folder, select all of the items, and re-zip them.
Sidenote: while you’re in the Content folder, double check that your index.html file is there. - Back on the Edit Course page, select “Browse Files,” then navigate to your project and upload your zip file. Once the upload is complete, check Draft and select “Process File.”
- Once the archive.zip file is done processing, you’ll be able to select your index (the html file). Swap out the resource file (in this case, goodbye.html) and switch to your own (index.html).
- At this point, go ahead and uncheck Draft and save your work.
- Time to make sure your Rise course in Thinkific is looking good. In the upper right corner, open the Preview drop-down menu and select “All Course Lessons.” Chances are, it looks great … except for that “Complete & Continue” button. Let’s talk more about that in the next section.
Create enviable courses in Rise
Are you a learning designer who loves trying new things in Articulate Rise? Then you’re going to love Mighty, a powerful little Chrome extension built to help you do more in Rise. With Mighty, you’ll get access to exclusive features and functionality that elevate visual design, increase efficiency, and deliver better learner experiences. You can try Mighty for free right now and find out for yourself—start your trial today!
Learn more and sign up→Part Two: Thinkific tutorial—Hiding your Thinkific course’s Complete & Continue Button (with the magic of Mighty)
As this Thinkific + Rise tutorial is a double feature, let’s move on to the next big-ticket item: hiding the Complete & Continue button. Before anything else, preview the whole Thinkific course. Upon opening your course preview, you’ll likely notice the Complete & Continue button in the bottom center of the page—time to get rid of it and keep your learners engaged.

But don’t worry, while this part of the Thinkific tutorial might seem intimidating, it’s nothing you can’t handle. You won’t even need to call Thinkific Customer Support.
- In Thinkific, you’ll need to add some custom code to your site. Go back to your Course Editing screen, exit out of Edit Course, and select “Settings” from the new menu on the left.
- In the Settings tab, select “Code & Analytics.” Here you’ll find a section called the Site Footer.
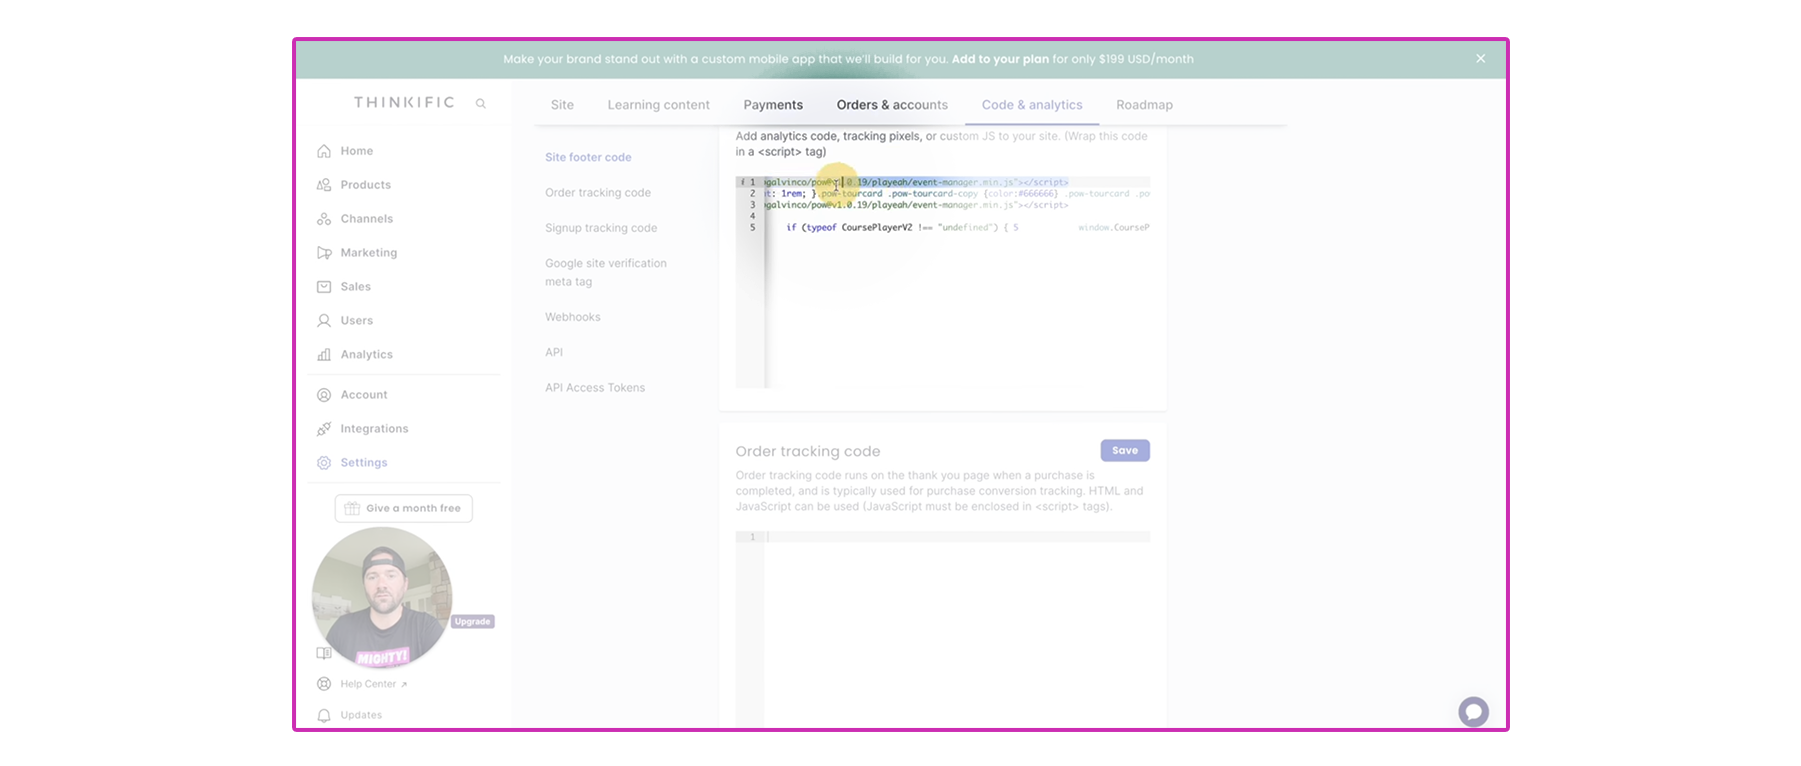 In this box, you need to add the following line of JavaScript:
<script src=”https://cdn.jsdelivr.net/gh/robgalvinco/pow@v1.0.19/playeah/event-manager.min.js”></script>
This line of code is responsible for setting up “listener events” that will be triggered by your course, which will hide (or show) the Complete & Continue button. After you’ve added your fancy new line of code, go ahead and save your work. - Time to head back to Articulate Rise and open up your course. Select “Theme” from the top menu, then “Custom Code” from the menu on the left. This is Mighty in action: the Custom Code block allows you to drop in code wherever and whenever you see fit—pop over and snag a free, no-credit-card-needed 30-day trial if you want to bring your Rise course to the next level.
- Here, we’re going to add some JavaScript that will trigger code contained in the link you’ve already added, which will hide your Complete & Continue button. To access the code, follow this link, go to Step 2, and copy the Javascript.
- Almost done. Next up, within that block of code, you’ll need to grab your block ID and replace the Block CSS Selector. To do this, look at your page in Custom Code mode; notice how you can hover the cursor over any of the Articulate Rise blocks and you’ll see block identifiers pop up on the right. Scroll all the way down to the “Complete the content above before moving on” button. Hover over it, then copy the snippet of code that pops up.
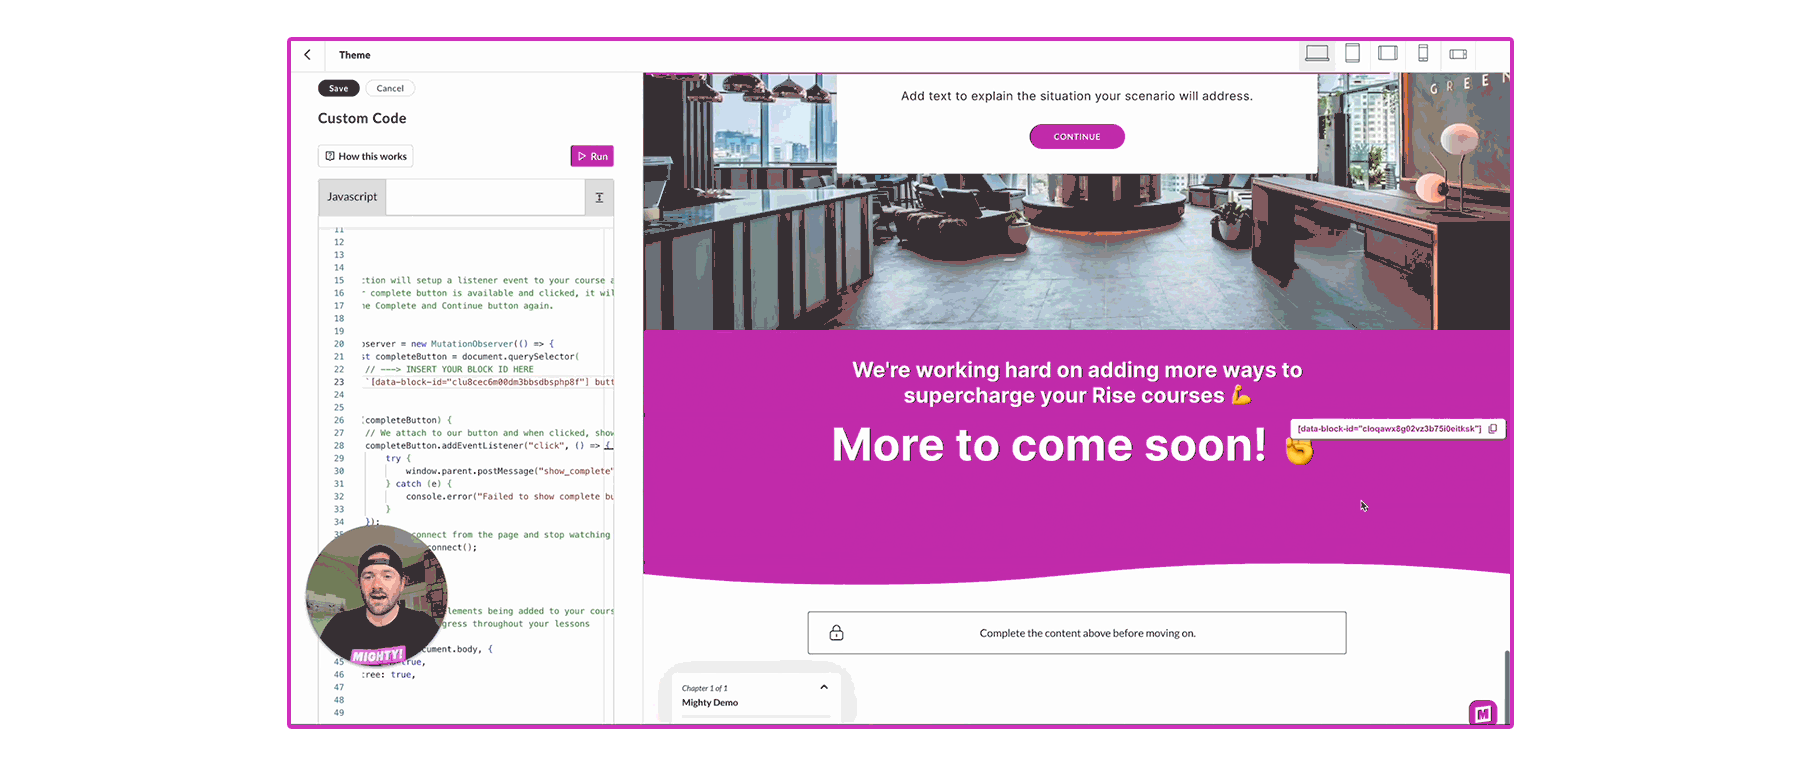
- All you have to do now is replace the code on the left, under “INSERT YOUR BLOCK ID HERE.”
Now’s a great time to save your work since you’re on the home stretch. - Finally, go back and select “Publish,” then “Web.” At this point, you just have to re-upload your course!
Optional quick review (Or: the victory lap)
You may very well know what you’re doing at this point. In that case, congratulations, you rock. If you need a little more help, no worries: we all do sometimes. The good news is, this mini Thinkific tutorial is basically the same as before: upload your course.
- Go to downloads.
- Unzip your file.
- Compress the files it contains.
- Head back to your test course and select “New Lesson.”
- Select “Browse Files” from within your multimedia lesson.
- Replace the old file with your brand-new custom file. Remember to save to Draft, then process the file.
- Once it’s done processing, change the resource file from goodbye.html to index.html.
- Uncheck Draft, then select “Save.”
- Allow the world to benefit from your beautiful new eLearning course!
Plus one course, minus one button.
While we love our learners, we also love helping our learning creators get the most out of their Rise + Thinkific courses. One of the best ways to ensure that your work is interacted with in exactly the way you imagined is with Mighty—an easy-to-use Chrome extension for Articulate Rise that gives creators the tools they need to make their courses shine.
Show the world what you and your work are made of with Mighty
Find out how you can snag a free, no-credit-card-needed, 30-day trial with Mighty today
Elevate with Mighty→